

Ventilation is a crucial yet often overlooked part of horticulture. Much like humans, plant growth needs air to survive. They use it for both photosynthesis and respiration. And as such, when there is no airflow in your grow tent, your plants will suffocate.
But leaving your grow tent open beats the entire purpose of it. You want an airtight grow tent ventilation system that doesn’t invite bacteria and humidity. Some people resort to simply adding in a few bracket fans. But there’s a much better alternative: a grow tent duct system.
Read on to learn about the different ventilation systems and how to implement them.
What is Grow Tent Ventilation?
Indoor gardeners have it way too easy. They get to control the temperature, humidity, and even the sunlight. So naturally, you would think that, as an indoor gardener, you’ve got it all figured out.
Unfortunately, there’s at least one significant growing aspect that many gardeners forget, even when you have the best grow tent on the market. And that is ventilation, much like how humans need access to fresh air. Keeping plants in an isolated space will suffocate them.
Grow tent ventilation can be provided in several ways, the simplest being an oscillating fan. But there’s a better way to do it: an inline duct system.
Why Do You Need to Ventilate Your Grow Room?
Grow tent ventilation is essential, but why so? There are several reasons why you might want to ventilate your grow room:
1. Respiration and Photosynthesis:
First, you need to ventilate the grow room to avoid suffocating your plants. Plants require carbon dioxide for photosynthesis and oxygen for respiration. Ventilating your grow room will promote the healthy circulation of these two gasses.
But don’t turn off the fan at night. While plants don’t photosynthesize at night, they still need ventilation for respiring.
2. Removing Heat:
There are several pieces of equipment in your grow room that are emitting heat. Your grow lights setup, humidifiers, and dehumidifiers release heat into the grow room. Therefore, ventilation is required to pull the heat out of the grow tent and keep your plants cool.
Excess heat can define the line between a healthy harvest and a barren garden. Plants are much more sedative to slight temperature changes than humans are. And you need to make sure to cool down your plants.
3. Maintaining Humidity:
Another factor that comes close to temperature is humidity. Plants release humidity through transpiration. In this process, the water moves from the soil through its roots and evaporates through the leaves. These vapors create moisture, which invites pests and reduces the equality of the growing conditions.
In addition to that, plants need to release water from the aerial parts to absorb it from the roots. Humidity in the air will slow diffusion, so your plants won’t release water. Ventilating the area will help to remove moist air and allow your plants to transpire more.
4. Preventing Mold and Pests:
Ventilation will drive out pests and mold and keep your plants thriving throughout the day. Several factors come into play here. Lack of ventilation can lead to the build-up of moisture. And if this moisture remains stagnant for long, it will develop fungi and mildew. A steady air ingress will make it harder for them to attach to the plants.
5. Simulating Wind Stress:
Fruit-bearing plants need to be healthy and rigid. And part of doing that comes from bearing wind stress. A gentle breeze can toughen up your plants and lead to healthy yields. Ventilating the area with a strong fan or vent will ensure that your plants don’t become too weak.
Gorilla grow tents have multiple properly placed ports to allow for the most beneficial grow tent ventilation system. More on our gorilla grow tent review.
What Parts Do I Need To Set Up Grow Tent Ventilation?
List of Parts:
1. Fan
A fan is the first part you’ll need for the grow tent ventilation system. Depending on your setup, you’ll be using different types of fans. Many people use a simple household oscillating fan or exhaust fan. However, for people who want to have a more complicated setup, look for an extractor fan. Also called the inline duct fan, its primary purpose is to evacuate unwanted air from the room and expel it elsewhere.
You can program the fan to only turn on at critical times of the day. One way to do this is to set up a thermostat to turn the fan on when the temperature rises above a set degree. Remember that you’ll need to do this even during the night.
2. Duct tubes
If you’re using a duct for a grow room ventilation system, you’ll also need the duct tubes. These tubes will act as a channel for the air evacuated by your fan. They’re usually made from aluminum, as it’s cheaper and can be shaped according to your desires. But you can also get them multi-layered if you want them to retain heat or stay protected.
3. Carbon Filter
Many modern duct setups also include a carbon filter. It is optional, but the filter can perform many vital tasks. Firstly, it will remove odors that might otherwise develop in an isolated grow room. Secondly, it will also trap pollutants and VOC emissions that might be present in the room.
4. Reverse duct system
Besides, people also include a reverse duct system, which serves as a grow room ventilation system. You might not need this as the evacuation duct will automatically cause the grow tent to pull air from the outside. However, you can consider this if you want to pump in fresh odors or strengthen a specific plant with wind stress.
How Big of a Fan Do I Need?
Your fan’s size will depend significantly on the grow tent volume in cubic feet, the accessories you’ll add, and your grow light’s heat. You can calculate your grow tent volume in feet with a simple tape measure. This is your base CFM (Cubic Feet per Minute).

When you’re using ducts, you need to take the bends into the calculation. The angle of their curves will affect your CFM. A 30-degree bend will require a 20% bigger fan, and a 90-degree bend will be 60% bigger. Your carbon filter will increase fan size by 60%, silencer by 20%, and LED grow lights by 50%.
How Much Ventilation Does A Grow Room Need?
Ventilation is highly essential for setting up your grow room. To calculate how much ventilation you need, here’s the formula:
Grow tent volume (in feet) x 1.2(no. of 30-degree bends) x 1.6(no. of 90-degree bends) x 1.6 x 1.2 x 1.5 = required fan CFM
Once you’ve calculated the CFM, buy the right type of fan that provides that. If you can’t find a fan of the right size, you can use more than one fan. But remember that each fan will add a silencer and carbon filter, along with more bends in the duct.
How to Ventilate Your Grow Room?
There are two ways to ventilate a grow room:
1. Simple Fan Setup:

The easiest way is to use household fans. You can either use a bracket exhaust fan or an oscillating fan.
Setup:
Place your fans near an open window or a door. You can also create a small hole in the wall for channeling the exhaust air. Remember that fans that should pull air out of a room need to have their front-facing outside. That way, they’ll pull in the air instead of supplying it. Fans that need to circulate air within the room or pump it from outside should be facing the normal way.
You can use oscillating fans to both provide wind stress and circulate the air within the room. This might also help with wind pollination.
Advantages:
- The simple fan setup is cheap and effective. You’ll hardly need a few bucks to buy these fans. And you can get bigger fan sizes to match your required CFM and grow room ventilation requirements.
- They don’t require constant maintenance. Just dust the fans at least once a month or two, and you’re good to go.
- You can set up oscillating fans to circulate the air within the room. This is different from merely allowing air to flow in and out of the room. Oscillating fans are cheap, and an inline duct system won’t do this job.
- Anyone can install them. Just get a few screws, watch a few video tutorials, and you’re all set.
- Likewise, taking them down is even easier.
- Many fans come with speed controls. And if you want to turn them off, you can simply use a switch or a pull-string.
Disadvantages:
- Fans are not enough to remove pollutants in the air.
- You can buy an air purifier for that, but a simple carbon filter with a duct system is much cheaper.
- You cannot attach silencers to them.
- Setting up a grow tent ventilation without noise is a big problem.
- Unless you set up a duct, you won’t be able to direct airflow wherever you want.
2. Inline Duct Setup:
If you want a grow tent ventilation system that’s much more efficient than the fan setup, consider the inline duct setup. This is the most common setup that growers of all experience levels use. It involves using an exhaust fan paired with an intricate duct setup and sometimes with a carbon filter and a silencer.
Setup:
Inline duct ventilation systems usually consist of a simple carbon filter, an inline fan, and a duct line. Some people might choose to add a silencer to each fan to keep their already-noisy grow tent quiet.
Regarding how you should set up the system, there are several choices:
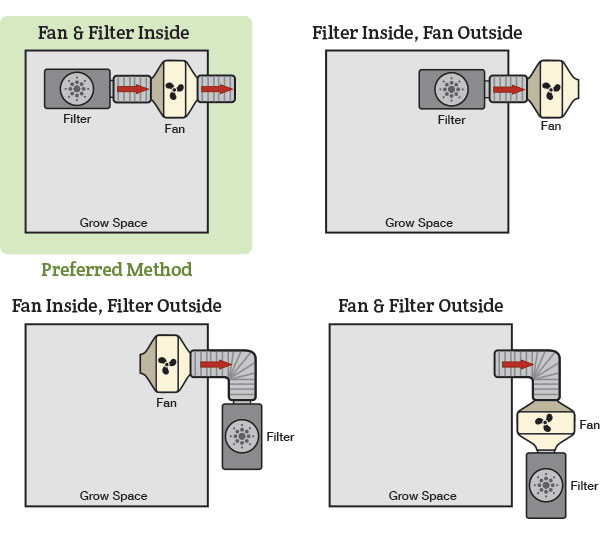
1. Fan and Filter Inside Grow Tent:
This is the most common configuration and most probably the best. You should place your filter and your fan directly inside the grow tent so that they pull the air straight out. This will mostly be useful when you’re trying to supply fresh air in the grow room ventilation system, as it will provide direct wind stress.
In this configuration, the filter will be in direct contact with the air, so more pollutants will get pulled out.
2. Fan and/or Filter Outside the Grow Space:

Source: Hydrobuilder
This configuration for grow room ventilation is less common, but it can be used if you don’t have any space inside the grow tent. You can place an opening for your duct inside the grow tent, and place your filter or your fan outside the space.
You can usually add both outside the space, but if you want to filter your air first, consider keeping the filter in. Filters catch dust and debris, which cleans the air for you and the fan. If you don’t want the fan to get dirty, place the filter before the fan.
3. Mounting:

Source: Blackdogled
Inside or outside, you’ll still want to consider your mounting options. Some people might mount their fan and filter up on a pole. However, there are some significant disadvantages to this.
Firstly, your ventilation system will be in direct contact with the walls of your room. It means that any noise and mechanical vibrations will be translated all through the room. The second disadvantage is that the fan and filter aren’t lightweight. They will weigh down the pole, affecting the setup’s structural integrity and possibly the room.
The better way to mount your fan and filter is to clamp it using a clip hanger from the ceiling or the mounting bars. This way, lesser vibrations will get transmitted, and your room or grow tent will hold better.
4. Silencing and Sealing:
Silencing is an essential part of setting up a ventilation system. The fan will make so much noise that it will be frustrating. There are two ways you can silence your ventilation system.
You can either install noise reduction clamps that absorb vibrations or use a separate silencer. If you use a silencer, it will be installed behind the fan. Whereas if you want to install a clamp, it will be directly connected to the duct.
Clamps are cheaper, but silencers are more efficient. If you’re not too bothered by the sound, consider the clamps.
Sealing is also essential. You don’t want any air leaks. Luckily, you can seal up the junctions using household duct tape.
5. Duct Setup:

Setting up your duct should be a bit more complicated. You need to decide how you’re going to mount it. Will you attach it to the ceiling, much like the fan and the filter? Or will you connect it to a flat surface like a pole?
You’ll also need to decide how many bends you want in your duct system and how sharp they should be.
Advantages:
- Inline duct systems perform filtration and optional silencing along with ventilation. Filters are essential for removing pollen and dust from the air, which is good news for growers with allergies.
- These systems allow you to direct air away from or to certain parts of your room. This means you get more targeted airflow.
- They reduce mechanical vibrations to the room if you mount them correctly. Bracket fans might not.
- They last longer than bracket fans. Although they cost more, they will last you for a good while with regular maintenance.
- You can buy fans of specified CFMs. Most bracket fans don’t have their CFMs mentioned.
Disadvantages:
- They cost more. Not only is the initial cost of the components and the installation high, but you’ll need to maintain them too.
- You can’t control the fan’s speed. This might vary from product to product, but usually, you do not have control over the fan’s speed. This could be a good thing since you’re only ever looking for a fan of a certain CFM. But if you want to vary the CFM, you’ll have to buy a new fan.
- They can be bulky. Many growers place their main components outside the grow room or tent.
- They’re heavy. It might be hard to install them on your own. And too many fans might weigh down the tent, even with noise reduction. Noise reduction only reduces vibrations. But gravity will still have its effect.
- You need to keep a maintenance check. You must change the filter every 6 months (even more if your plants are pollinating). And you need to dust the fan, which will be harder since you’ll have to remove the entire setup.
Grow Room Ventilation FAQ:
Can I use an air purifier in my grow room for the ventilation system?
You can use an air purifier in your grow room, depending on the type of air purifier. Most HEPA filters are harmless. Photocatalytic air purifiers are also safe if the plants are not directly near them. Ozone generators should not be placed in the room but in the hallways outside. Ionizers and carbon filters are also safe.
How often should air be exchanged in my grow room?
You should completely exhaust the air in your grow room and replace it with fresh air at least every 3 to 5 minutes. You can do this by choosing a fan with the right CFM. CFM is measured per minute. So, you can get a fan with at most five times less CFM than you need. This would mean that all the air will get evacuated in 5 minutes.
Conclusion
There you have it. Now you know the importance of ventilation in the grow tent. The plants in your indoor garden won’t grow if you don’t create a similar ventilation system to the natural air (if not better). The better the air moves have a surprisingly big effect on indoor plants’ growth. Whether you go for an inline duct setup or a simple fan setup, it’s up to you.